Are tiles waterproof? Well… not really. The short answer is no, and the long answer? Still no—but let’s talk about why! While tiles can handle water pretty well, they aren’t completely waterproof, and neither is grout. That’s why proper installation and waterproofing are key if you want to avoid water damage down the line.
Continue reading to learn which tiles handle water best, why moisture absorption matters, and how to ensure your tile installation is truly waterproof, an important factor when choosing the right bathroom tiles for your home.
.
Are Tiles Waterproof? Understanding Tile Types and Waterproofing
Tile adds so much character, style, and attitude to a room it’s difficult NOT to use it. Let’s start by looking at three types of tile and how they might work in a shower.
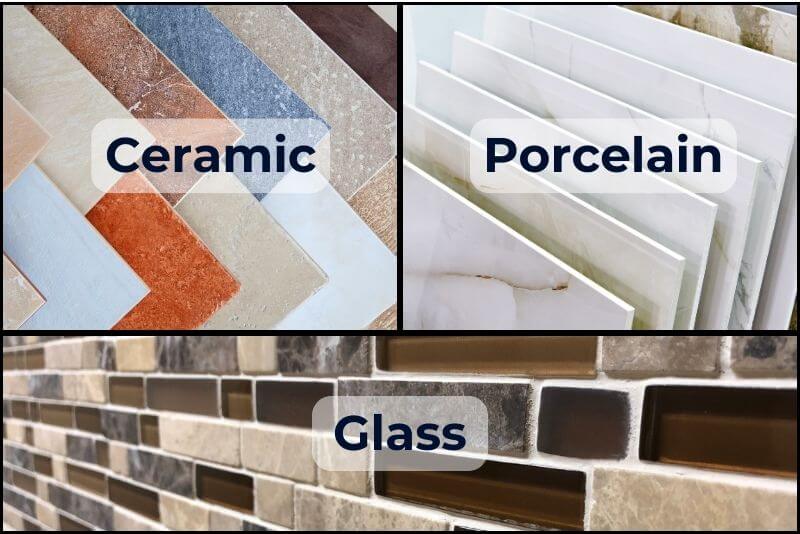
Ceramic Tile
Ceramic tiles are considered water-resistant rather than waterproof. While they won’t get damaged by water, they can absorb moisture over time. Because of this, they may not be the best choice for areas with frequent water exposure, like showers. If you choose ceramic tile for a bathroom, it’s best to use it in dry areas or apply a high-quality sealant to reduce water absorption.
Porcelain Tile
Porcelain tiles are often labeled as “waterproof” because they have a low water absorption rate. While they don’t visibly absorb water, moisture can still seep in over time. This makes porcelain an excellent choice for wet areas like bathrooms and kitchens. However, to maximize its durability in high-moisture environments, proper installation and sealing are essential.
Glass Tile
Glass tile is the only tile that is truly 100% waterproof. Its non-porous surface prevents any water absorption, making it an excellent choice for areas with high moisture exposure, such as showers and backsplashes. However, even with waterproof tiles, proper substrate waterproofing is crucial. Without it, moisture can still seep into the underlying surface, leading to potential damage over time.
How Moisture Absorption Affects Tile’s Waterproofing
When evaluating the type of tile you want to use, you need to know its moisture absorption rate, especially if you’ll be using it in places where there will be a lot of water, like a shower. Let’s take a quick look at the four moisture absorption ratings:
- Non-vitreous (Low density) – Tile with water absorption of more than 7.0%
- Semi-vitreous (Medium-density) – Tile with water absorption between 3.0% and 7.0%. Ceramic tile is often in this category.
- Vitreous (High Density) – Tile with water absorption of more than 0.5%, but not more than 3.0%
- Impervious (Extremely dense) – Tile with water absorption of 0.5% or less. Porcelain tile is often rated as impervious or vitreous. And of course glass tile with its 0.0% absorption rate falls into the impervious category.
Tile and stone finishes, along with grout, retain some water, and the tile’s density affects how much. So before you rush out to the nearest home improvement store, think about how much water the tile will be exposed to and if the tile will be outdoors. An outdoor location is only an issue if you get major freezing temperatures in the winter – think Michigan, Minnesota, North Dakota, Maine, and Canada.
Does the Substrate Affect the Tile’s Waterproofing?
The durability of your tile will be only as good as what’s beneath it (a.k.a. the substrate). And here is where we need to stress that you should allow a professional to do this. You can surreptitiously check out the installer as he/she is doing the work, you know just to make sure they know what they’re doing. If your tile professional tries to mount your tile directly on drywall, then you know they’re doing it wrong. Begone, rank amateur!
The reason we’re focusing on the shower here is that it is the place that dispenses the largest amount of water. Once water soaks through tile and grout, it can seep through to the studs causing the wood to swell. Just one simple and quick way to give yourself a huge headache and an even larger repair bill.
So it’s well worth the money to have the job done right the first time. Hire a professional to install your tile, especially in the shower since tile and grout are not waterproof. Ask neighbors for referrals or look up local businesses in your area through Home Advisor, Angie’s List, and others. The reviews should help you find a competent installer.
Let’s look at several of the correct practices that will assure you that your new tiled shower is in fact waterproof.
Make sure your new tiled shower is waterproof
Step One – The Shower Liner
Ensure the corners on the shower liner are folded not cut. However, one outside corner will need to be cut for proper fitting. According to the standards of Tile Council of North America (TCNA), the shower pan liner should extend up the wall 3 inches above the curb framing. It also needs to go up and over the curb, like a bad driver, to the front of the curb. To avoid one of the most common causes of a leaking shower, ask your installer to use a pre-formed corner shower pan.
Step Two – Attach the Liner to the Front of the Curb
If the shower pan liner is installed 3 inches above the curb, and you see nails below the curb, find another tile setter. The correct thing to do is use nails, staples, or glue to attach the liner to the front of the curb (the side that doesn’t get wet).
Step Three – Don’t Use Cement Board on the Curb
Instead, use a metal lath and a sand/cement mix; the same thing the shower pan is made out of.
Step Four – Perform a Flood Test
If your shower will leak, it’s best to find out before it’s tiled. To perform a flood test, your installer should plug the drain and fill the shower with water just below the top of the curb. If there are no leaks, you can rest assured, knowing your shower has been properly waterproofed before you hand over that last payment.
Step Five – Tape and Mud the Seams
Make sure the seams are covered with alkaline-resistant mesh tape and a couple of layers of mud. If not done, when the walls flex you’ll be able to see a crack all the way around the shower.
Step Six – Never Use Tile Mastic Adhesive in a Shower
Or anywhere else for that matter. Tile mastic is a premixed organic adhesive. Don’t use it in wet areas, on cement or fiber cement boards, floors, with glass tile, or natural stone. Basically, never use it anywhere – ever. Stop it right now.
Frequently Asked Questions
1. Are tiles waterproof or water-resistant?
Are tiles waterproof? Most tiles are not fully waterproof but are water-resistant, meaning they can handle moisture without immediate damage. However, grout and the installation system still allow some water to pass through over time.
2. What type of tile works best in bathrooms and showers?
Porcelain and glass tiles perform best in wet areas because they have very low or no water absorption. Porcelain is highly durable for everyday use, while glass is completely non-porous but still requires proper waterproofing behind it.
3. Why is waterproofing important even when using tile?
Water can still reach the surface beneath tiles through grout lines or poor installation. Proper waterproofing protects the structure from leaks, mold, and long-term water damage.
Conclusion
When tiling a shower, be sure to hire a professional. It takes a lot of experience to properly install tile. There are several steps for preparation and waterproofing that cannot be skipped. Now that you have some of the basic waterproofing facts, do yourself a favor and hire a competent tile installer. You’ll be able to ask the right questions and understand the process as it goes along. And when it’s all said and done, you’ll have a sparkling new waterproof shower!
Sources:


